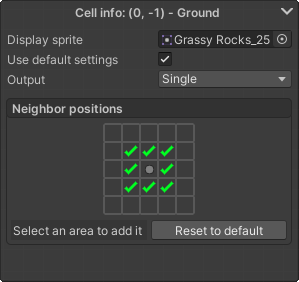
Grid cell inspector
The Grid cell inspector is used to change properties of a specific grid cell. These options include the same options you’d find in the Tiling rule section of a regular rule tile. You can change options like the sprite output, collider and linked game object. The actual Tiling rule are set by placing tiles around the sprites on the Grid.

To access the inspector window select the inspector tool from the Toolbar or by using Keyboard shortcuts (E), and select a grid cell using it by left clicking on the grid cell. This will highlight the selected tile with a yellow outline and show the grid cell inspector window in the bottom right corner. This window will be hidden if you select any other tool apart from the Selection tool.

Grid cell options
In the inspector options you’ll see a few options based on your Export options. If Universal sprite settings is enabled, every option that is related to the sprite output will move over to the Sprite override settings window, where you can change the settings per sprite instead of per grid cell. This way you don’t need to change the settings for every cell that has the same sprite output, only for that one sprite in the override settings window.
-
Display sprite - This field contains a reference to the sprite which is displayed on the grid, changing the sprite here would be the same as using the Brush tool to change the sprite.
-
Use default settings - If this is enabled the sprite will use the default collider and game object of the Tile which you can change in the Tile inspector window. If you disable this you’ll gain access to these two options.
To make it easier to find cells that have been modified, there’s an option on the Toolbar to highlight any cells that have been modified. When this option is enabled an cells that have been modified will be highlighted with a flashing outline.
- Output - This option will change the sprite output of the Tiling rule.
Sprite options
The sprite output settings are identical to the ones in the Sprite override settings window. to read about these settings go to that page.
-
Neighbor positions - In this window you can change where the tile will check for the neighbor to determine the rule. This window is similar to the one you can see when creating a regular rule tile, with the only difference that this one only determines the positions to check for, and not the actual rules. If you want to extend the range by a significant amount, you can switch over to the Selection tool, select the area around the inspected cell that you want to check for, and click the Add selection tool. This way you don’t have to click each cell one by one.
-
Transform - This option determines whether or not the sprite can be rotated or mirrored to fit the rules. To change this option click the center square in the Neighbor positions grid, this will cycle through the options. When the cell is part of a preset block this option will be instead shown as a dropdown, and will apply to the entire preset block, not just that one cell.
[!Preset blocks] If the cell is part of a preset block, the neighbor positions option will be disabled because the preet block manages them. Instead the neighbor positions section will show the options for the preset block.